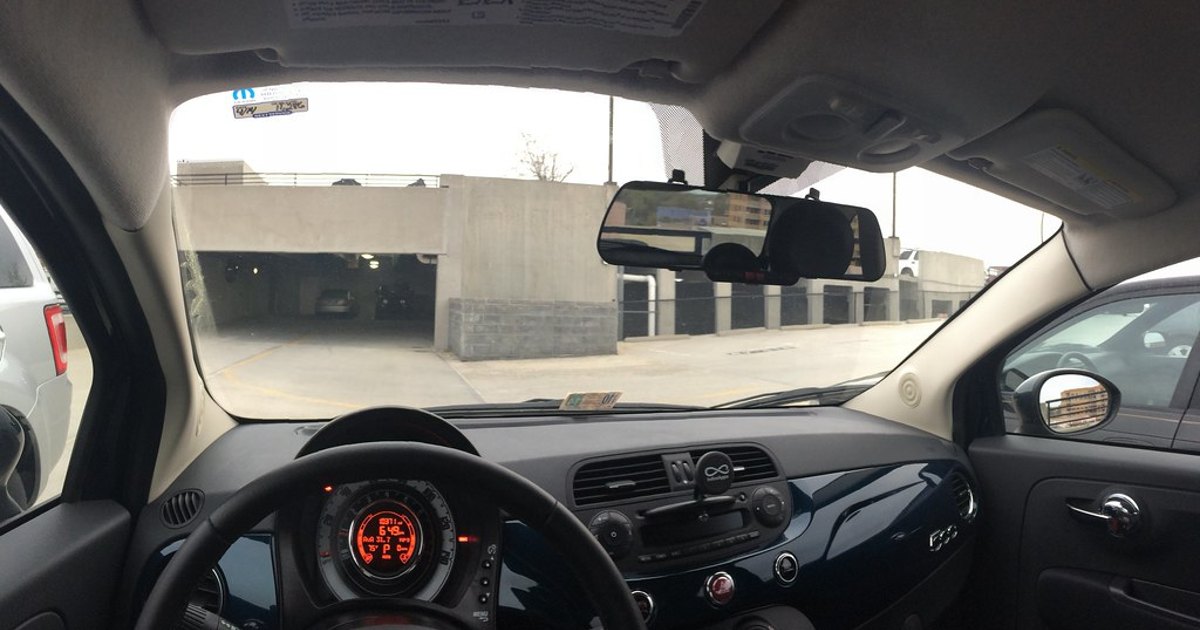
For most cars, the best place for a dash cam is high on the windshield immediately to the right of the rearview mirror, tucked so the camera body hides behind the mirror housing from the driver’s seat and the lens looks out through the area the wipers clean. That centers the picture on the road, keeps the camera out of your sightline, and comes closest to what the strictest state rules describe. The lower passenger-side corner is the main alternative, and some states name it explicitly.
Key Takeaways
- Behind or just beside the rearview mirror is the default spot: it hides the camera from the driver, centers the image, and keeps the lens inside the wiper sweep.
- Windshield obstruction laws differ by state, and a few name specific zones — California names three: a seven-inch square in the lower passenger corner, a five-inch square in the lower driver corner outside an airbag zone, and a five-inch square at the center top.
- Check the field of view with the camera powered on and held in place before you commit; adhesive mounts can be very hard to remove once set.
- Route the power cable along the headliner and down the A-pillar only where your manual says the trim is free of airbag components.
- You usually do not need a second camera, a hardwire kit, or a new mount.
Start with the behind-the-mirror position
The mirror already sits in a part of the windshield that law and vehicle designers treat as acceptably blocked. Putting the camera immediately next to it, on the passenger side, buys three things: the mirror housing screens the camera body from your eyes, the lens sits near the centerline so the picture is not skewed toward one lane, and the glass in front of the lens is normally inside the wiper sweep.
Mount the camera so its body is level with, or slightly below, the top edge of the mirror. If it hangs lower, it intrudes into your view of the road — which is what state obstruction statutes are written about.
Virginia’s statute describes this position plainly: the section “shall not be construed to prohibit the suspension and use of any dashboard camera” provided the camera, wires and attachments are “wholly or mostly concealed behind the rear view mirror” without any additional obstruction (Code of Virginia § 46.2-1054, retrieved 2026-09-14).
What state rules actually say — and why you should read yours
There is no single national rule for dash cam placement in a passenger car. Some states write detailed exceptions, some write a general obstruction standard and leave the rest to an officer’s judgment, and some do not mention cameras at all. Read your own state’s vehicle code before you assume a spot is fine. The table below is not legal advice and not a fifty-state survey.
| Jurisdiction | What the text says | Practical effect |
|---|---|---|
| California | § 26708(b)(13)(A) exempts a video event recorder in a 7-inch square in the lower corner farthest from the driver, a 5-inch square in the lower corner nearest the driver and outside an airbag deployment zone, or a 5-inch square at the center uppermost portion of the windshield’s interior. | Three named zones. The center-top square is the behind-the-mirror spot; the lower passenger corner gets the most room. |
| Minnesota | § 169.71 bars objects suspended between driver and windshield, then excepts “driver feedback and safety monitoring equipment when mounted immediately behind, slightly above, or slightly below the rearview mirror.” | No dimensions, and the statute never says “dash cam.” The position it describes is the mirror zone. |
| Virginia | § 46.2-1054(C) permits a dashboard camera whose camera, wires and attachments are wholly or mostly concealed behind the rearview mirror. | Cameras are named, and the tidiness of the cable run is part of the standard. |
| Commercial vehicles (federal) | 49 CFR § 393.60(e)(1)(ii) allows vehicle safety technologies on the interior windshield no more than 8.5 inches below the top of the wiper-swept area, no more than 7 inches above its bottom edge, and outside the driver’s sight lines. | Not your commute car, but a sensible template: high in the swept area, out of the sight lines. |
Sources: California Legislative Information, Minnesota Revisor of Statutes, Code of Virginia and GovInfo, 49 CFR § 393.60, all retrieved 2026-09-14.
Two details are easy to miss. California’s driver-side option is limited to a spot “outside of an airbag deployment zone.” Its exception is written for a “video event recorder,” defined in the same section as a device that records continuously in a digital loop and saves audio, video and G-force data on a triggering event. A vehicle with one must post a visible notice stating that “a passenger’s conversation may be recorded.”
Virginia adds a wrinkle in the other direction: subsection B says no officer may stop a vehicle for a violation of that section, and that evidence obtained from such a stop is inadmissible. That limits the traffic-stop risk in Virginia specifically. It does not repeal the placement standard in subsection C, and says nothing about other states.
Aim the lens before you commit to the spot
Field of view depends on where the camera sits and how it is tilted, and you cannot judge either from outside the car. Garmin’s instructions for its Dash Cam 45/54/55/65W family suggest connecting the device to power and holding it in the intended location to check its field of view before installing anything (Garmin, retrieved 2026-09-14). That advice is specific to those models, but it works with any camera that has a screen or a phone app.
What you are looking for:
- Horizon roughly across the middle of the frame. Sky above it carries no detail you need; road below it does.
- Both lane lines visible well ahead of the car, not cropped at the corners.
- Your hood edge just barely in shot, or not at all.
- No mirror housing, sun-shade band or roof trim in the top of the frame.
- The lens inside the wiper-swept area, so rain does not sit permanently in front of it.
Zones to keep clear
Behind the mirror is not automatically free space. Before you stick anything down, look at the glass and check your vehicle’s manual:
- Sensor and camera housings. Some vehicles carry forward-facing cameras and other driver-assist sensors in a housing behind the mirror. Do not crowd the window those look through; if the housing is wide, shift the dash cam further onto the passenger side.
- Embedded heating elements or antenna traces. Some windshields have thin conductive lines running through the glass. Keep the lens off them.
- The shaded frit band at the top. The dark ceramic border is opaque; mount low enough that the lens clears it.
- Anything your manual flags as an airbag path, including A-pillar and headliner trim, which matters most for the cable run.
Adhesive or suction — and how temperature decides it
Most cameras ship with an adhesive pad; suction mounts trade permanence for the ability to take the camera off between trips. The catch: Garmin warns that its adhesive mount is “extremely difficult to remove after it is installed” and tells owners to consider the location carefully first (Garmin, retrieved 2026-09-14).
Temperature decides whether the install takes at all. Those same instructions specify an ambient temperature between 21°C and 38°C (70°F and 100°F), glass cleaned with water or alcohol and a lint-free cloth, free of dust, wax, oils and coatings, and 30 seconds of firm pressure on the mount and again on the disc. Owners are then told to wait 24 hours before attaching the camera, because not letting the adhesive cure “may cause the mount to detach from the windshield” (Garmin, retrieved 2026-09-14). Those numbers belong to that product line — read your own manual — but the pattern holds: warm glass, clean glass, real pressure, then patience. Installing colder than the manual allows, or hanging the camera before the adhesive cures, is what those instructions warn will make a mount detach later.
Suction earns its place in a rental or shared car, or while you are still deciding on a position. Plan on re-seating it periodically, and check whether your manual gives an operating temperature range for the mount.
Routing the cable
A dangling cable is untidy and, under a statute like Virginia’s, part of what an officer is looking at. Garmin notes that its included vehicle power cable “is designed to be routed out of sight,” is long enough to route around the windshield in most vehicles, and can be hidden along or behind the trim or headliner (Garmin, retrieved 2026-09-14).
The usual path runs from the camera up into the headliner gap, across to the passenger A-pillar, down the pillar, then into the door weatherstrip or under the glovebox to the power socket. Tuck the cable into the edge of the headliner and weatherstrip rather than prying off A-pillar trim, and check your manual for which trim conceals a curtain airbag. If the pillar is an airbag path, run the cable down the weatherstrip channel beside it.
Rear and interior cameras
A rear camera is worth it mainly if you worry about being rear-ended or you park on the street. Mount it high and centered near the top edge of the rear glass, with the lens between defroster grid lines rather than on one. If the rear glass is tinted, the camera shoots through that tint, so check a night clip before settling on the spot. An interior-facing camera is a rideshare and fleet tool; in a private car it mostly records you, and it raises the consent question California’s notice requirement points at.
When you do not need to buy anything
Plenty of placement problems cost nothing to fix. If footage is dark or washed out, re-aim before assuming the camera is bad — check whether the frame is filled with sky. If the mount sags, clean the glass and re-stick it in a warm garage rather than ordering a replacement. If the cable shows, it is probably long enough to route properly; you rarely need a hardwire kit unless you want parking surveillance with the ignition off. And if you already own a wide-lens camera, a second front camera adds nothing. The upgrade that helps most people is a better-placed camera, not another one.
Quick placement checklist
- Read your state’s windshield obstruction statute and any camera exception in it.
- Choose the spot beside or behind the mirror; fall back to the lower passenger corner if sensors crowd it.
- Check the manual for sensor housings, heated elements and airbag trim.
- Power the camera, hold it in place, and confirm the framing on the live view.
- Clean the glass with alcohol or water and a lint-free cloth.
- Install at a temperature your manual allows, press firmly, and wait the full cure time before hanging the camera.
- Route the cable along the headliner edge and down the pillar or weatherstrip, clear of airbag paths.
- Drive ten minutes, then review the clip in daylight and at night before calling it done.
Photo: “Fiat 500 with E-Prance (Novatek) rearview mirror dashcam” by brownpau, licensed under CC BY 2.0. Resized and cropped to 1200×630. Illustrative stock photo; no product testing is implied.